
How to configure RGB lights on Massdrop CTRL using QMK
Quick steps and resources on how to configure your Massdrop CTRL lights when programming it with QMK.
Most of the material discussed here is based on the amazing Last Continue GitHub repo. Visit it for more information and make sure to star it!
Unless you need some advanced functionality, Drop's configurator is enough to set up your key config and LED behaviour when a particular layer is active.
But what happens when you want to leverage QMK goodies and keep the RGBs going?
If you have read my WhiteFox Build Log you've seen a couple of examples such as IGNORE_MOD_TAP_INTERRUPT that require using QMK without any configurator.
I wanted to apply the same configuration on my Massdrop CTRL while using the LED in the same way you can using the Drop configurator.
If you don't have a keymap yet, I recommend using the QMK Configurator. It has the Massdrop CTRL among the options and you can download the source code once you finish the initial layer setup.
Once you have your keymap set up, review the default keymap.c found in the QMK GitHub repo. At the end you'll see these lines:
led_instruction_t led_instructions[] = {
	// { .flags = LED_FLAG_MATCH_ID | LED_FLAG_USE_RGB, .id0 = 10, .id1 = 9, .r = 255, .g = 0, .b = 0 },
	// { .flags = LED_FLAG_MATCH_ID | LED_FLAG_USE_PATTERN, .id0 = 4, .id1 = 0, .pattern_id = 8 },
	// { .flags = LED_FLAG_MATCH_ID | LED_FLAG_USE_RGB, .id0 = 8, .id1 = 0, .r = 0, .g = 255, .b = 0 },
	// { .flags = LED_FLAG_MATCH_ID | LED_FLAG_USE_PATTERN, .id = 16, .id1 = 0, .pattern_id = 9 },
	// { .flags = LED_FLAG_MATCH_ID | LED_FLAG_USE_RGB, .id0 = 32, .id1 = 0, .r = 0, .g = 0, .b = 255 },
	// { .flags = LED_FLAG_MATCH_ID | LED_FLAG_USE_ROTATE_PATTERN, .id0 = 64, .id1 = 0},
	// { .flags = LED_FLAG_MATCH_ID | LED_FLAG_MATCH_LAYER | LED_FLAG_USE_ROTATE_PATTERN, .id0 = 262144, .id1 = 0, .layer = 0 },
	// { .flags = LED_FLAG_MATCH_ID | LED_FLAG_MATCH_LAYER | LED_FLAG_USE_ROTATE_PATTERN, .id = 16777216, .id1 = 0, .layer = 1 },
	{ .end = 1 }
};
These are the instructions to configure your RGB lights!
Instructions Details
The first set (e.g. LED_FLAG_MATCH_ID | LED_FLAG_USE_RGB) indicates what lights will be activated, the ids group the different LED in your keyboard and [.r, .g, .b]; .pattern_id; .layer provide the values for the lights.
Flags
The initial LED_FLAG parameters provide the context for the rest of the instruction.
LED_FLAG_MATCH_ID: Indicates that you want this instruction to apply to the id number you specify. You'll use this 99% of the time.LED_FLAG_USE_RGB: Indicates what color will be displayed by the LED you specify with the id groups. As you probably guessed, you need to input the color using the[.r, .g, .b]parameters.LED_FLAG_USE_PATTERN: Indicates you want to use a pattern from led_programs.c. From that file, you need to get the corresponding number fromled_setups[]and use the.pattern_idparameter in your LED instruction.LED_FLAG_MATCH_LAYER: Indicates that you want to use this instruction only while the layer in the.layerparameter is active.
IDs
As LastContinue explains on his GitHub repo, the LED are represented by groups using bitwise operations so you need to convert the lights identifiers you want to address with your instructions.
Thankfully, the scripts provided in the repo already do the calculation for you. Copy the python3 script into any online Python console and run the script changing the arrays. You only need one array to calculate what goes into an individual instruction.
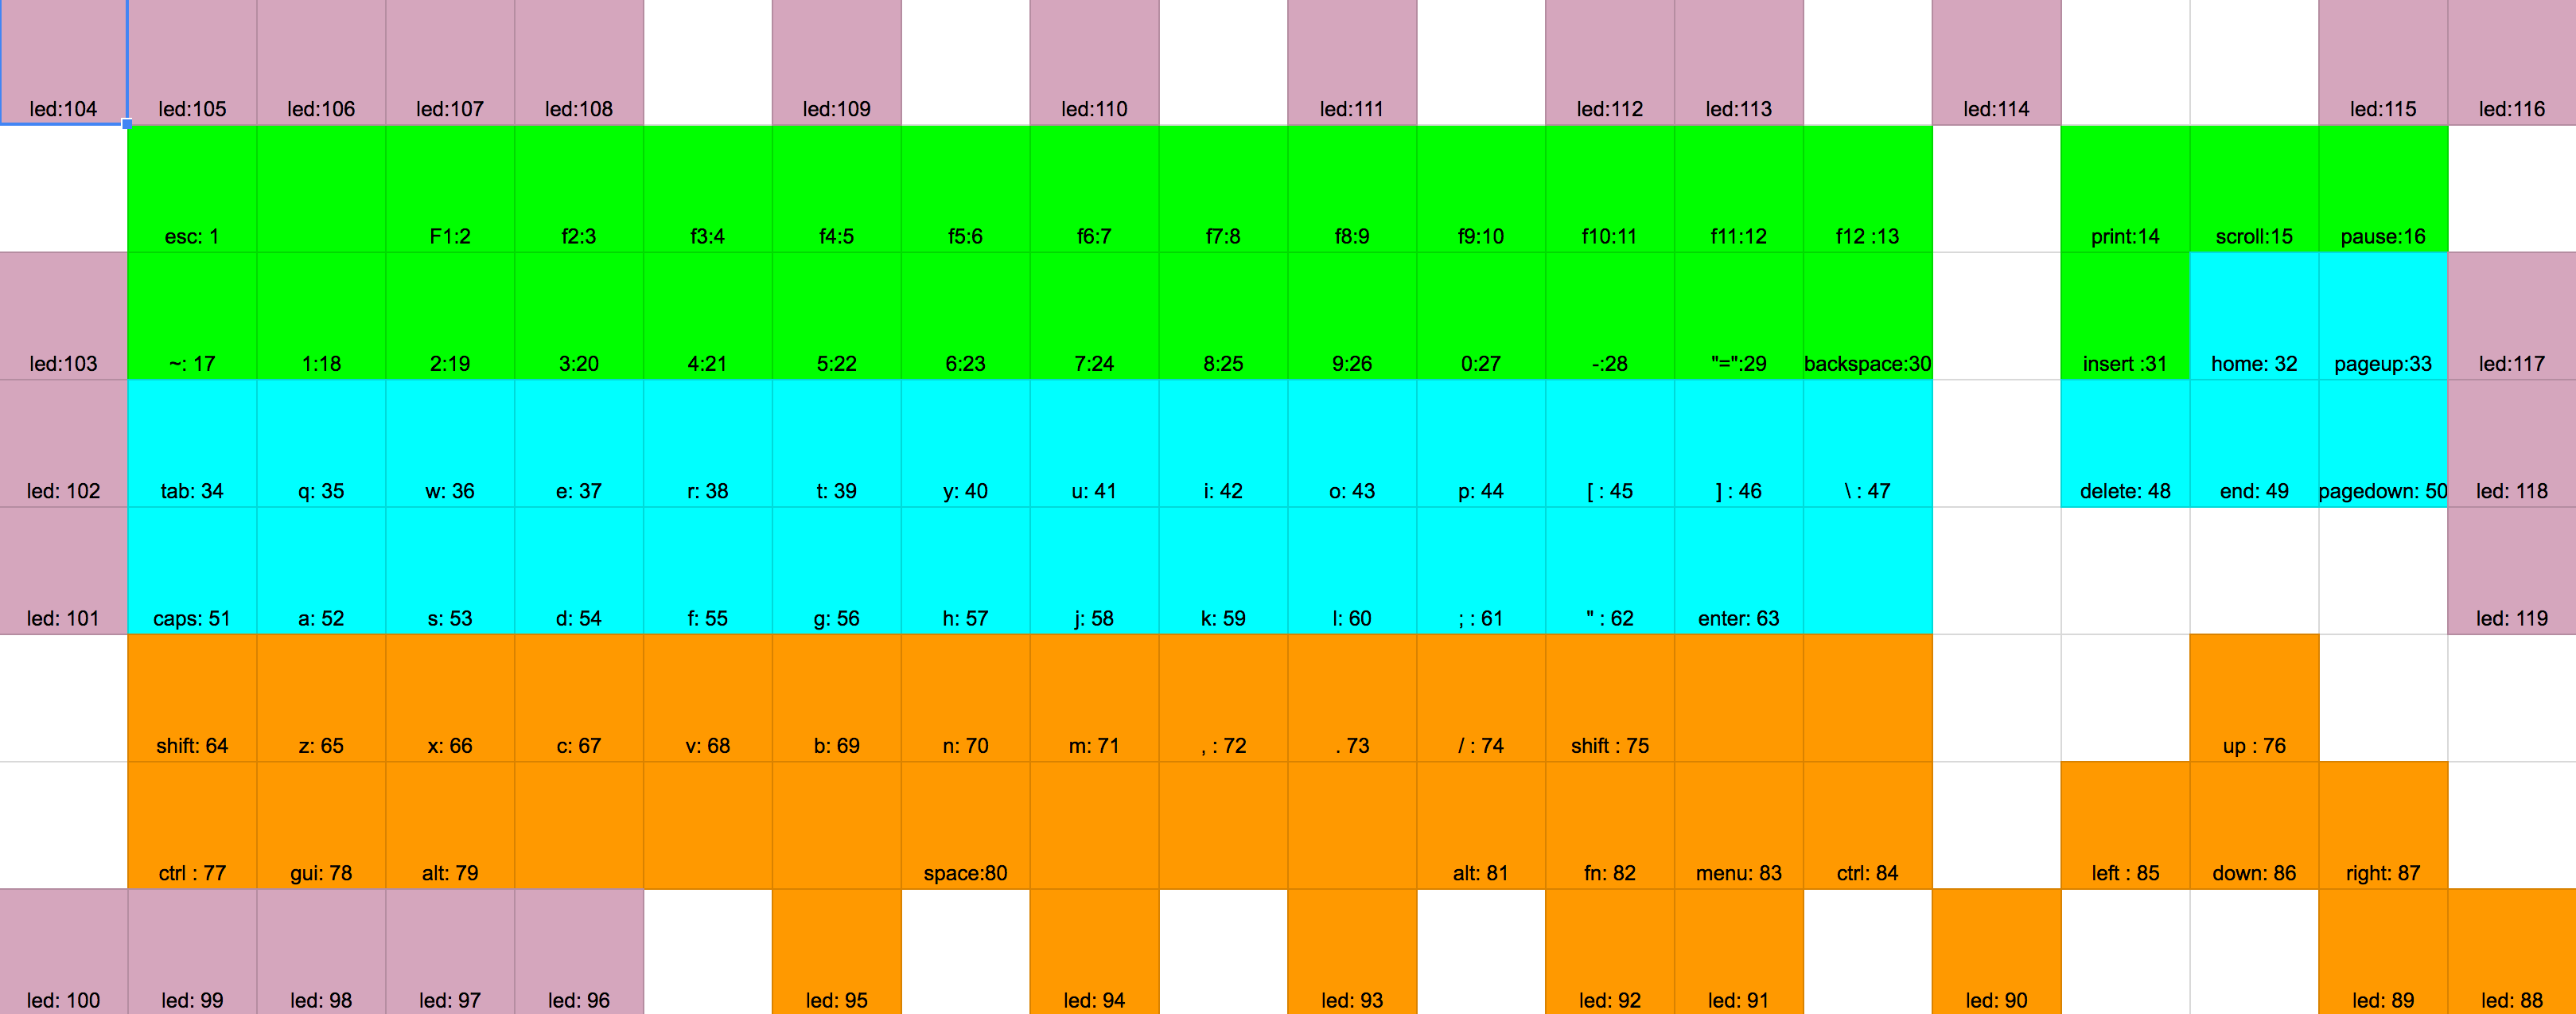
Use the handy LED map to identify which lights you want to add to the array:
Example
Let's go over an example with 2 layers:
- While layer 0 is active, I want a blue back light with green arrow keys and the rest off.
- While layer 1 is active, the whole keyboard should be red.
Let's get the corresponding RGB values:
- Blue: 33, 150, 243
- Green: 76, 175, 80
- Red: 244, 67, 54
Then let's calculate the LED .id groups using the scripts and LED map:
- Back light is represented by the identifiers 88 to 120 so the array can be written with the function range(88,120). Using that in the script returns:
.id0 = 0, .id1 = 0, .id2 = 4286578688, .id3 = 8388607. - Arrow keys are [76, 85, 86, 87]. That returns
.id0 = 0, .id1 = 0, .id2 = 7342080, .id3 = 0 - The whole keyboard is range(1,120). That returns
.id0 = 4294967295, .id1 = 4294967295, .id2 = 4294967295, .id3 = 8388607.
Now that we have all the numbers, we need to write our instructions with the correct flags. A couple of things:
- Make sure to end the instruction block with
{ .end = 1 }. - You don't need to add the .id groups that are 0.
led_instruction_t led_instructions[] = {
	{ .flags = LED_FLAG_MATCH_ID | LED_FLAG_MATCH_LAYER | LED_FLAG_USE_RGB, .id2 = 4286578688, .id3 = 8388607, .layer = 0, .r = 33, .g =150, .b = 243},
	{ .flags = LED_FLAG_MATCH_ID | LED_FLAG_MATCH_LAYER | LED_FLAG_USE_RGB, .id2 = 7342080, .layer = 0, .r = 76, .g =175, .b = 80},
	{ .flags = LED_FLAG_MATCH_ID | LED_FLAG_MATCH_LAYER | LED_FLAG_USE_RGB, .id0 = 4294967295, .id1 = 4294967295, .id2 = 4294967295, .id3 = 8388607, .layer = 1,  .r = 244, .g =67, .b = 54},
	{ .end = 1 }
};
Now the only thing left is to follow the QMK Massdrop instructions to compile your keymap with lights enabled!
Keep in mind that you might need to add a rules.mk file next to your keymap with the following instruction to make use of the RGB:
OPT_DEFS += -DUSE_MASSDROP_CONFIGURATOR
Have fun!